
Beamline Phone Number:
+44 (0) 1235 778418
Principal Beamline Scientist:
Dave Allan
Tel: +44 (0) 1235 778644
E-mail: [email protected]
Email: [email protected]
Tel: +44 (0)1235 4494052
If you need an EHC to intervene in the hutch, please press the Make Hutch Safe button to close the shutter and create space at the sample position.

It should be possible to start centring as soon as the robot has finished loading the sample – remember there is an auto centring routine which will try to run first. There are 3 likely causes for manual centring not working:
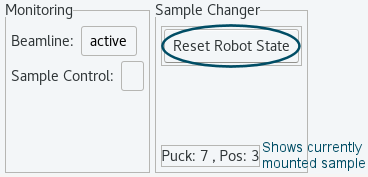
a) The robot is still active
Click on the Reset Robot State button to deactivate the robot and pass control back to the GDA. (There is never any harm in pressing this button, even if that wasn't the cause.)
b) One of the centre axes is in an error state
Check the status of the axes in EPICS:
Click on DIFF1S to open all of the axes
If any of the centring axes (Centre X, Y, Z) are flashing red, click on one of the buttons for the affected axis.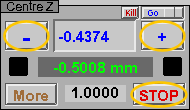
Normally, this will be enough and the axis should work again
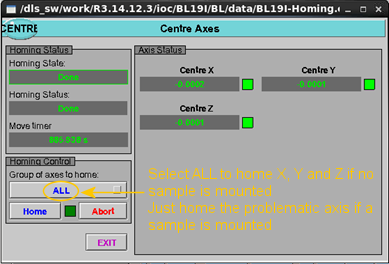
If there is still an issue, then the axis will need rehoming.
Click on the Homing Screens button on the synoptic and select Centre Axes from the list which appears.

Select the relevant axis from the drop-down menu and click Home
A good starting point for crystal centring is x=0.9, y=3.1, z=-1.2. Type these numbers in the DIFF1S window, in the relevent boxes with the blue numbers and press enter.
c) The robot has mis-seated the sample on loading
The robot loading relies on the sample mount being in the correct location. Sometimes one (or more) of the centre axes can get lost and then, when the centre axes drive to the robot mount position, the real position is not correct although the motors think they are right.
a) If the robot doesn’t move and no messages appear in the Jython console
Check the GDA connection to the robot is ON - go to Samples in the main tabs menu and check the button status in the Sample Changer Options tab. If the On button is available but all buttons underneath are greyed out, the robot will not operate until the On button is clicked.
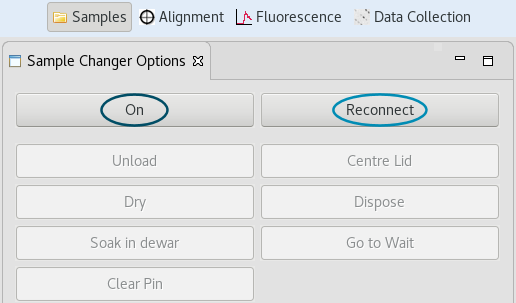
It will also be necessary to click Reconnect if there are any program or controller errors reported.
b) If the robot doesn’t move and there is an error message stating “Dewar lid not found”
Use the webcam to check for ice on the white Dewar lid – the lid hole is defined as a circle within a square and if the lid is very icy, the red square can become obscured. Ask the local contact or EHC to use the hair dryer to warm up the lids and remove all ice and moisture. Also ask them to check the lid heater is enabled.
c) If the robot doesn’t move and there is an error message stating “Pin not sensed on goniometer before load”
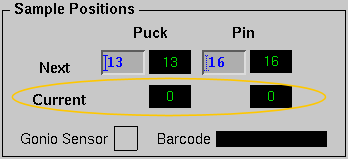
i) No pin mounted - Check (using the cameras) to see whether there is a sample mounted. If there isn’t, for example one was removed manually, check if the system thinks there is a sample mounted, either in the EPICS window or in ISPyB. They should report current Puck: 0, Pin: 0 when there is no sample mounted. If different values are shown, ask the EHC or local contact to manually correct this.
ii) A pin is mounted - If there is a pin mounted but the pin sensor can’t see it, ask the local contact or EHC to check the pin sensor.
d) If the robot doesn’t move and there is an error message stating the “Sample position is not ready” or “Beamline not safe”
This means one or more of the goniometer axes has failed to move to the correct position for the robot to be able to mount/retrieve a sample.
i) Ensure you are using the GDA to run robot scripts - EPICS does not run the script to drive the goniometer to the load position.
ii) Check the status of the EH1 diffractometer and make sure none of the axes (mostly likely Centre Z) are in a red error state {see point 1b}.
iii) The omega and 2 theta axis positions are confirmed as being in the safe range by the colour sensor readings – occasionally the sensor fails to see the yellow indicator tape (there is no warning period, it just fails).
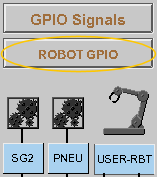
To check this, open DIFF1S and ROBOT GPIO from the main synoptic:
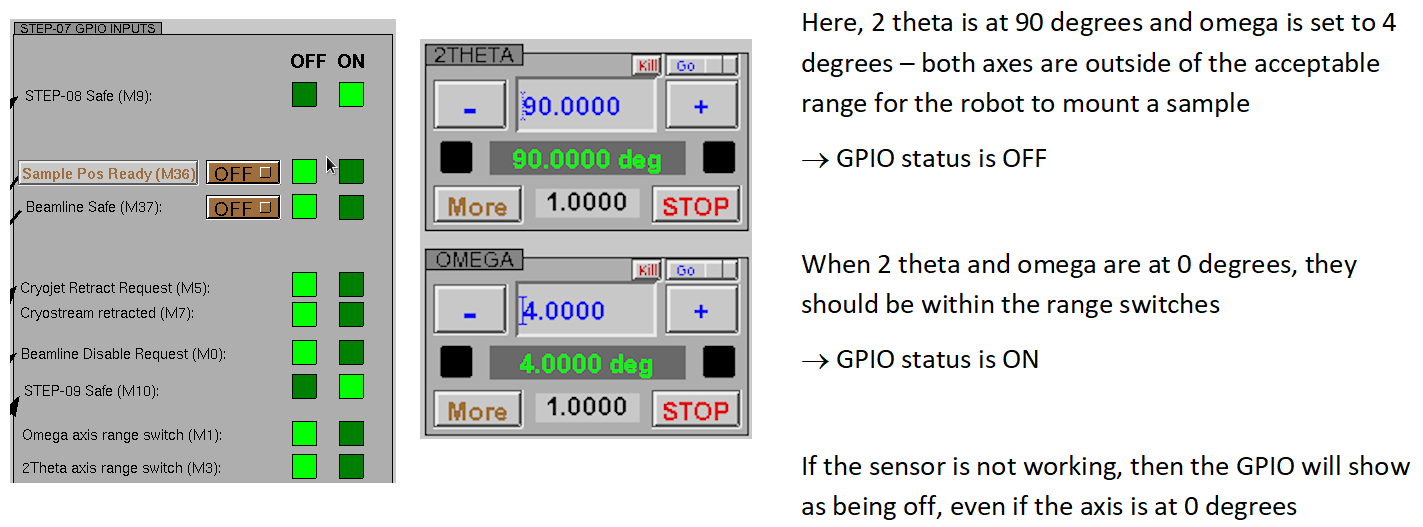
If this is the problem, call the local contact / EHC and ask them to add another layer of yellow tape in the appropriate place – the tape is kept in one of the green boxes on the blue tool board in the corner of the hutch. If an EHC needs to access the tape locations, please drive to omega = -20 and 2 theta = 90.
e) If the robot moved but failed to collect the sample from the goniometer
There is an pop-up error reporting “Pin sensed on goniometer mid-exchange”. Check the end effector for ice – if it is too cold and icy, the gripper is unable to close and will fail to close around the mounted sample. Press Reconnect to clear the error. Then, either wait a couple of minutes and try again or press Reset Robot State followed by Dry to send the robot to the dryer before trying again. (The end effector gets icy when the Dewar refills.)
f) If the robot moved but failed to load the next sample
There is an error reported stating “No pin mounted after load”.
i) This could be due to the formation of ice causing the end effector to be unable to collect the next sample in the Dewar - send the robot to dry {see point 2e}.
ii) The sample in that position is misaligned or not present - ask the local contact or EHC to check the sample puck in the Dewar.
g) The robot crashed, but has done a slow recovery back to the wait position
i) Note where the robot crashed and, if this is likely to be an issue again, call the local contact or EHC.
ii) If the robot crashed and it wasn’t clear what caused the problem, or it won’t be an issue again, it is possible to continue.
Click on the Reconnect button once recovery is complete, to clear the error.
h) The robot crashed and remains in the crash position
If the robot has stopped near the wait position:
Note: this will only work if the robot knows its actual location. If this doesn’t work call the local contact or an EHC for assistance.
If the robot is anywhere other than near the home location, call the local contact or EHC for assistance.
a) Previous user group has left the last sample mounted
Please remember to unload your final sample!
As long as the pucks haven’t been removed, just carry on and load your next sample - EPICS knows which sample is mounted, even if you don't, so the exchange will happen safely.
If the pucks have been changed so the sample can’t be returned, use the “Dispose” button.
b) The robot has failed to return the sample to the puck
The robot picked up the sample from the goniometer but failed to leave it in the puck. This sometimes happens if there is an e-stop. (Note that sometimes the gripper holds on to the sample, but it normally it drops the sample on the floor after an e-stop.)
If the sample is still in the gripper, once the robot is back in the home position, click on Dispose in the Sample Changer tab of the GDA - it might be necessary to clear any errors by doing a “Reconnect” first and then a “Reset Robot State” to make the buttons active again. The sample should be dropped in the pot on the dryer and make it possible to continue. It may be necessary to ask the local contact or EHC to update the mounted pin information.
If this fails, ask the local contact or EHC to remove the sample manually and, if necessary, update the mounted pin information.

Diamond Light Source is the UK's national synchrotron science facility, located at the Harwell Science and Innovation Campus in Oxfordshire.
Copyright © 2022 Diamond Light Source
Diamond Light Source Ltd
Diamond House
Harwell Science & Innovation Campus
Didcot
Oxfordshire
OX11 0DE
Diamond Light Source® and the Diamond logo are registered trademarks of Diamond Light Source Ltd
Registered in England and Wales at Diamond House, Harwell Science and Innovation Campus, Didcot, Oxfordshire, OX11 0DE, United Kingdom. Company number: 4375679. VAT number: 287 461 957. Economic Operators Registration and Identification (EORI) number: GB287461957003.

 Crystallography